We will be creating our own Ropmare Bearden inspired collage.
Thursday, September 26, 2013
Romare Bearden
As a class we are going to look at an artist named Romare Bearden. We will be reading the handout in front of you an answering the questions as a class.
We will be creating our own Ropmare Bearden inspired collage.
What I want you took concentrate on are the activities and things that surround your community and life style. Just Like Bearden tell us YOUR life STORY.
We will be creating our own Ropmare Bearden inspired collage.

Thursday, September 19, 2013
WORD WORLD
This lesson is going to incorporate more design then anything. Have you ever gazed at the clouds and images started to appear? Have you ever looked at a word long enough and it starts to look unrecognizable? Well if you answered yes, that is exactly what we are going to do with this project. You are all going to create a drawn animal by using the letters that make up that animals name.
We are going to watch a show that does just this.
Thursday, September 12, 2013
Louise Nevelson Born in Russia on September 23, 1899 – April 17, 1988. Came to America with her family when she was young. She is considered an American sculptor known for her monumental, monochromatic, wooden wall pieces. She called her large found wooden object sculptures "crates". Louise Nevelson liked to call herself the original "recycler."
Goal- Create and original recycled piece of artwork inspired by Louise Nevelson. Include a eye catching design, and use layers to show depth in your sculpture.
Monday, September 9, 2013

Friday, August 30, 2013

Wednesday, August 28, 2013
Kaleidoscope Name Design

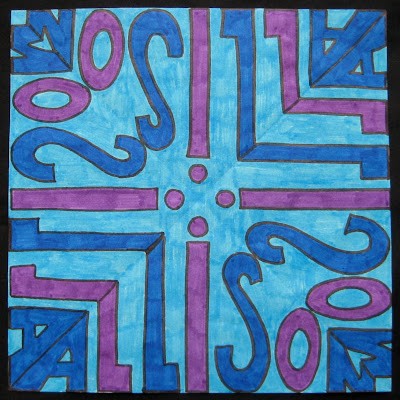


Materials:
- 2 square pieces of paper the same size (copy paper usually works well)
- Pencil and eraser
- Scissors
- Black “F” Sharpie
- Colored pencils or markers
Directions for lower grades:
1. First, fold both of your papers in half diagonally, then in half again. Unfold both of them and set one aside.
2. Cut out one of the triangles created by your fold lines on just one of the papers.
3. With the flat edge along the bottom and the point facing up, write your name with large stick letters so that it fills the entire triangle.
4. Now, draw an outline around your stick letters to make nice, thick letters that touch all three sides of your triangle. Trace over your pencil lines with Sharpie.
5. Next, place the triangle with your name on it under one of the corresponding triangles on the other paper. Trace your outline letters with pencil onto the new paper. (It can be helpful to use a light box or even tape your papers to a window for tracing. You could also try using a more translucent paper if it’s difficult to see your lines, although cheap copy paper works great for me.)
6. Continue tracing your name onto each section, flipping your name over every other time to achieve a “mirror image”. (Flipping your name over every other time is essential to achieving a mirror image, so don’t forget this important step!!)
7. Then, trace over all your pencil lines with Sharpie.
8. Color with markers or colored pencils.
1. First, fold both of your papers in half diagonally, then in half again. Unfold both of them and set one aside.
2. Cut out one of the triangles created by your fold lines on just one of the papers.
3. With the flat edge along the bottom and the point facing up, write your name with large stick letters so that it fills the entire triangle.
4. Now, draw an outline around your stick letters to make nice, thick letters that touch all three sides of your triangle. Trace over your pencil lines with Sharpie.
5. Next, place the triangle with your name on it under one of the corresponding triangles on the other paper. Trace your outline letters with pencil onto the new paper. (It can be helpful to use a light box or even tape your papers to a window for tracing. You could also try using a more translucent paper if it’s difficult to see your lines, although cheap copy paper works great for me.)
6. Continue tracing your name onto each section, flipping your name over every other time to achieve a “mirror image”. (Flipping your name over every other time is essential to achieving a mirror image, so don’t forget this important step!!)
7. Then, trace over all your pencil lines with Sharpie.
8. Color with markers or colored pencils.
Monday, August 26, 2013
Tuesday
Welcome to Intro to Art
In this class we will explore a wide array of art mediums. We will dibble and dabble with different eras, artists, techniques and cultures. This class is tons of fun, if you are open to trying new things.
This is your class blog site that I will communicate your weekly lessons on. We will explore the blog today so you fully understand how it can be beneficial to you and your parents.
Subscribe to:
Posts (Atom)